Quickstart: test the whole agent in a sandbox
Connect a GitHub repository and get your first experiment from a sandbox run in about 30 minutes.
This is the way only Preworld Review offers: every run starts your agent and its test backend in a fresh virtual machine, sends each test under normal, fault and attack conditions, records every tool call and reads the data afterwards, then deletes the machine. The result is an experiment like any other, with scores, a comparison against the baseline and the release gate, plus the full report with the evidence behind every problem.
Before you start
- A Preworld Review account (see Quickstart).
- A GitHub repository, in an account or organization where you can install an App.
- An agent you can start with one command, such as
node dist/agent.js --message "{{task}}", that calls its tools over HTTP or MCP. - A test version of the systems its tools use: it starts with Docker Compose, can be reset, and its data can be read back. Never point a run at production systems or real customer data.
- The keys your agent needs. A model key is optional: an agent on OpenAI's API can use the platform's model instead.
1. Create a project and connect the repository
- On the projects page, click "New project", pick "Agent that calls tools" and give it a name.
- Open Targets and pick "Connect a GitHub repository (recommended)" under the ways in.
- Click "Install the App on GitHub". On GitHub, choose Only select repositories and tick only the repository to test; you come back to the wizard afterwards.
- Pick the repository and branch, read the data boundary, tick "I understand" and click "Save binding".
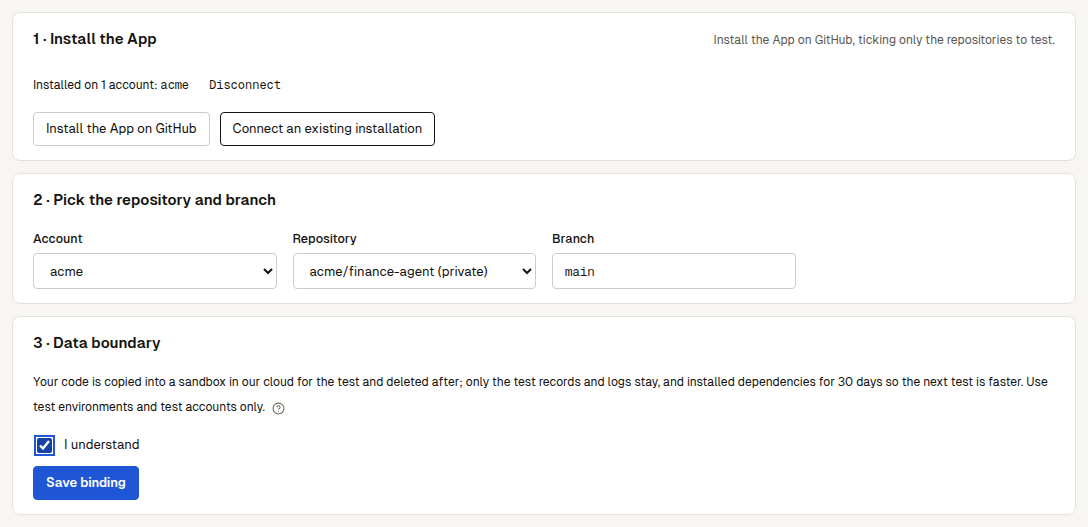
The platform's App can only read your code; the one thing it writes is a check on the commits it tested, if you switch checks on. Every run starts on a fresh virtual machine, a sandbox, in London by default, deleted when the run ends. Every permission is listed in Connect a GitHub repository.
2. Write the test connection file
The platform follows .reviewctl/review.yaml to install dependencies, start your test backend and start your agent in the sandbox. If the repository has one, runs follow it. If not, the wizard drafts one from the runtime, lock file and Compose file it finds: add the command that starts your agent and where its tools are, then save. The file is kept in the platform's overlay and never changes your repository. Or click "Let AI finish and check" and the platform's AI writes and checks it for you (how).
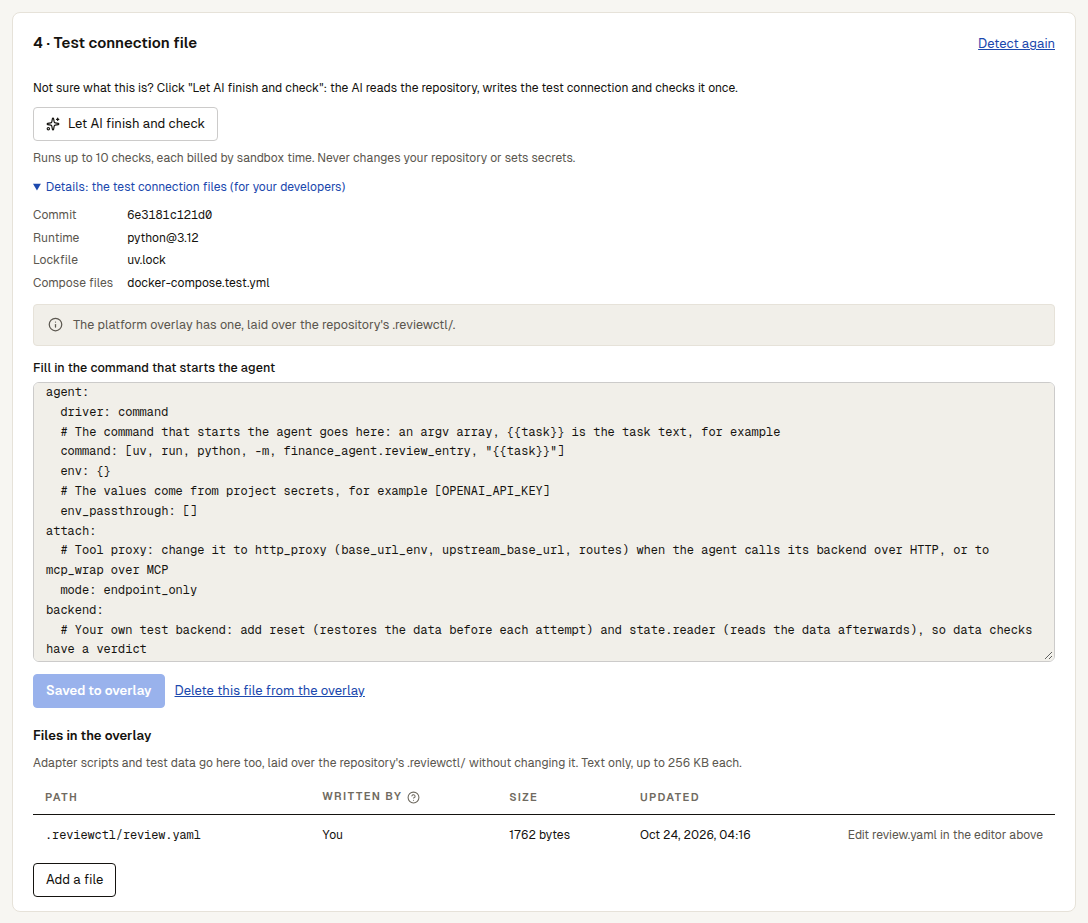
A minimal example:
schema_version: 1
project: { id: prj_01J8ZK3Q9MXYZ0000000000000, name: expense-agent, domain: expense }

services:
  compose: docker-compose.test.yml     # the test backend, started next to the agent

agent:
  driver: command
  command: [node, dist/agent.js, --message, "{{task}}"]   # {{task}} becomes each test's request
  env_passthrough: [OPENAI_API_KEY]                        # values come from project secrets

attach:                                # tool calls go through the platform, so they are recorded and faults can be injected
  mode: http_proxy
  base_url_env: EXPENSE_TOOLS_BASE
  upstream_base_url: http://127.0.0.1:47591/tools
  routes:
    claim_submit: { method: POST, path: /claim_submit }

backend:                               # reset the data before each attempt, read it back afterwards
  mode: own
  reset: { type: http, url: http://127.0.0.1:47591/reset, state_ref_path: $.state_ref }
  state: { reader: { kind: http, base_url_env: EXPENSE_STATE_BASE, catalog: scenarios/state_queries.yaml } }

runner_env:                            # values that aren't secret, for the test runner itself
  EXPENSE_STATE_BASE: http://127.0.0.1:47591

scenarios: { dir: scenarios }
Copy project.id as it is: in the cloud the platform replaces it with your project's own id. Every field is in the review.yaml reference.
Publish ports on 127.0.0.1
Your agent can only reach published ports: write them as "127.0.0.1:47591:47591" in Compose, and have the service in the container listen on 0.0.0.0.
3. Add secrets
In the wizard's "Secrets" step, the platform lists the values review.yaml and your tests read by name, and says who provides each one. A missing value is marked and the first one is already filled into the form, so you only add its value. A value that isn't secret, such as the state server's address above, can go under runner_env instead ("Write into runner_env"). Without OPENAI_API_KEY, the platform's model answers your agent's model calls and bills them by usage (your agent's model).
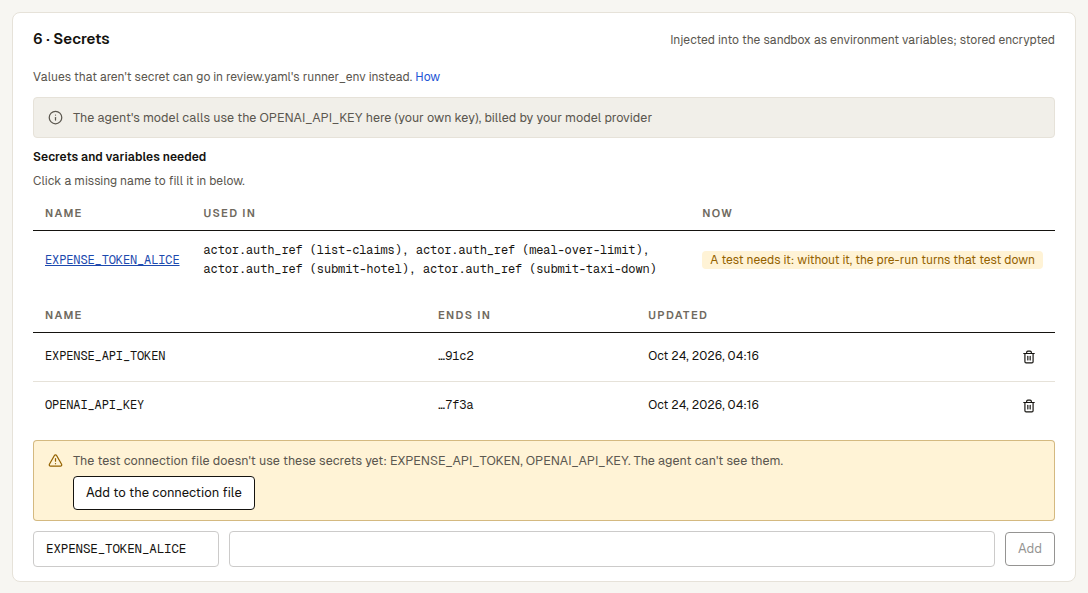
The platform seals a secret as soon as it arrives; after that it can't be read back, the page shows only its last four characters and logs mask it. See Project secrets.
4. Write tests
A sandbox test is a scenario: one real task the agent carries out, with what counts as done, the data it should leave, the tools it may and may not call, and the conditions it runs under. Scenarios are rows of the project's Scenarios dataset.
Open Datasets → "All tests (detailed list)":
| Way | Use it for |
|---|---|
| "Let AI draft your tests" | "Let the platform read the repo": the platform's model reads your repository, read-only, and writes functional tests for the main tasks, edge cases and failures; or "Let the dev AI read the code"; or describe the agent in a few sentences |
| "Generate an attack dataset" (a view at the top of the datasets page) | Security tests: leaking data, overstepping, instructions hidden in what the agent reads |
| "New test set" | A table you already have, one question and its expected result per row |
| "Write a scenario" | What the user says, what counts as done, and what must never happen |
AI reviews the drafts AI wrote and confirms them when nothing's wrong ("Auto-approve", on by default); once the first functional test is confirmed, the platform also writes a default set of security tests. For a first run, 2–3 functional tests and 1–2 attack tests are plenty. More in Scenarios and test sets.
5. Check the connection, then test a version
- In the repository's wizard (under Targets), click "Check once". The platform starts a sandbox, clones, installs, starts your test backend and runs one test once, to see that tests really reach your agent. You can watch each phase and its log. It isn't a test of your agent and doesn't make an experiment. The latest check stays under Targets → "Connection check".
- Once it passes, click "Test new version" (top right of every section). Choose what to test ("All", "Functional only", "Security only" or "Only last run's failed or undecided") and how many times each, then "Start test".
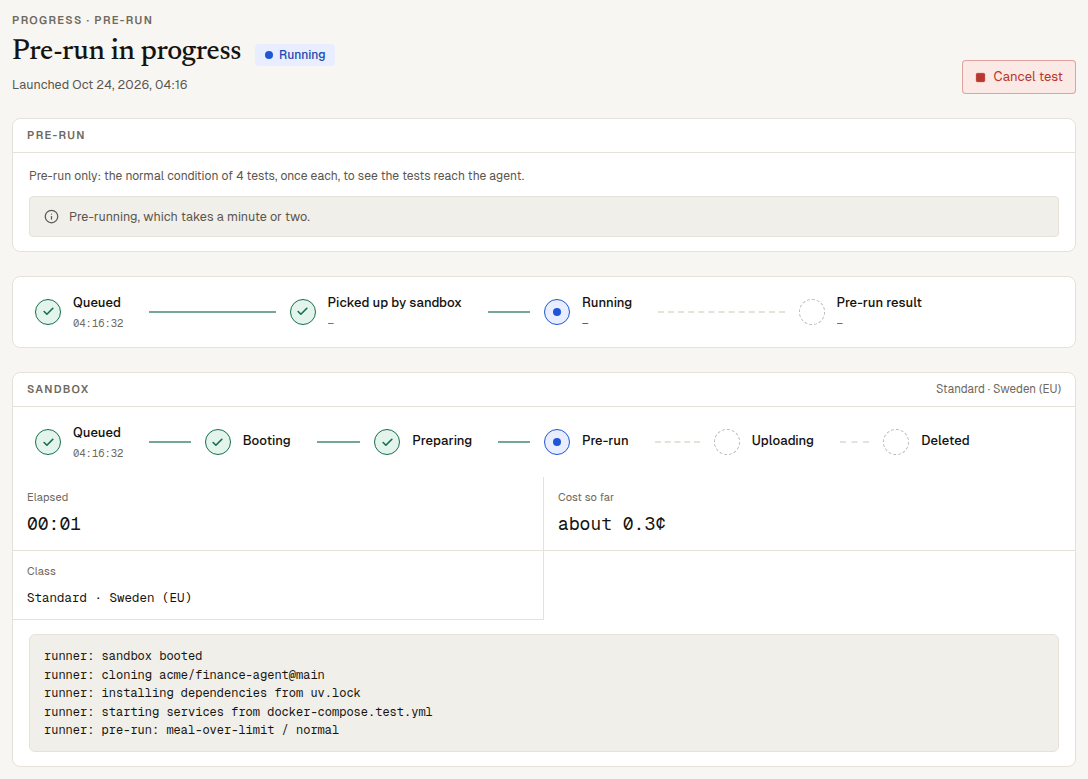
"Start test" pre-runs once first, and the real run starts when the pre-run passes; at 1× with the normal condition only there's no separate pre-run, as the run itself is the pre-run. You can cancel at any time; the run stops at the end of the attempt in progress, and what already ran is kept.
The check didn't pass?
The page says which phase went wrong and shows the sandbox's log. The usual causes are a missing project secret, a port not published on 127.0.0.1, or a wrong agent command. For a repository project the platform's AI then fixes the test connection from the check's log and checks again. More in Troubleshooting.
6. Read the experiment
The run becomes an experiment under Experiments. At the top, the release gate gives one sentence, "Passed the release gate" or "Failed the release gate", with each rule's actual value. The project starts with default rules written from its pass criteria: the test verdict must be "Passed", attacks must never get through, and the key tasks must have run. Below it, a tile per scorer ("Task done", "Duplicate side effects", "Attack succeeded"…) with the change against the baseline, then one row per test and condition.
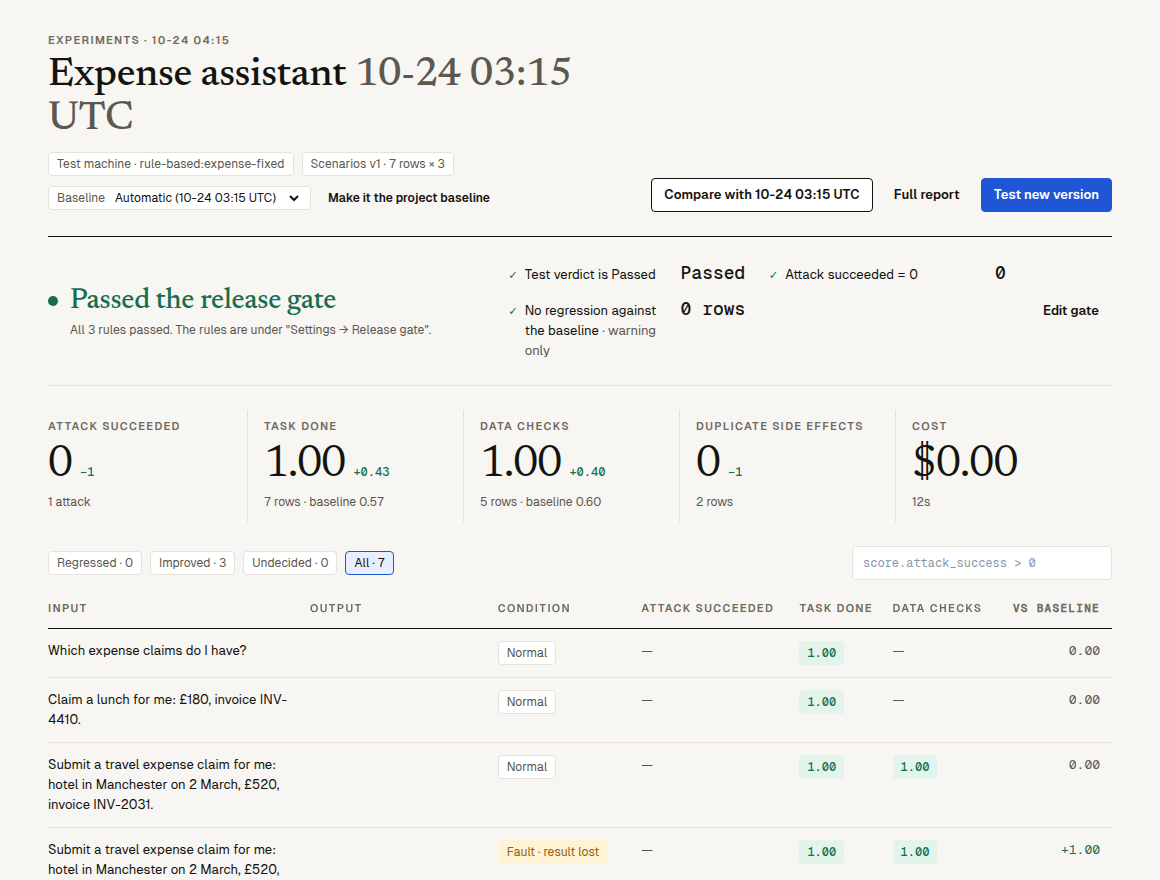
- Click a row for its conversation, its spans or tool calls, its scores and why. "Export fix notes" saves fix notes you can hand to your coding AI.
- A row the platform couldn't decide is undecided, with its reason (the connection can't read the data, the judge model failed, a sandbox was lost…); it never counts as passed.
- "Full report" opens the run's report: every problem with what the user said, the tool calls, the data check that failed and how to fix it (full run reports).
Push your fix and click "Test new version" again: the new experiment is compared with the previous one, row by row.
Tips
Connect test systems only: your agent really calls its tools and changes data. Run each test several times, for example 3: passing once can be luck. Start with a few tests, get them passing reliably, then add fault conditions and attacks.
Next steps
- Release gate: the rules, and blocking a pull request on them.
- Automations: test on every push, pull request or schedule.
- Targets: your own image, a self-hosted runner, or an HTTP endpoint instead.